.png)
How to Make Harakeke Paper
- Jun 4, 2025
- 4 min read
Making harakeke paper is a practical way to use up leftover scraps from weaving. It’s a hands-on process that turns what would usually be waste into something useful and beautiful. Here’s how we do it:

What You’ll Need
Leftover harakeke (the para from stripped harakeke works best)
A large pot and a stirring stick
Muslin cloth with a knot at one end
Baking soda
Water
A machine to break thick fibres down (if needed)
A hollander beater
Mould and Deckle (wire mesh screens)
Sponges and rollers (for removing excess water)
A surface for drying (we use GIB board off cuts but have also used glass)
Step 1: Boil the Harakeke
Place your harakeke fibres into a large pot with a couple handfuls of baking soda. The baking soda helps to soften the fibres and begin breaking them down. Keep the pot topped up with water, as it tends to evaporate over time, and let it boil for several hours. The exact time will depend on how thick the fibres are. The harakeke won’t fully disintegrate at this stage, but this process helps kick-start the breakdown.


Step 2: Break Down Thick Fibres
If your fibres still have a lot of structure after boiling, you can run them through a machine that breaks them down further before moving to the next step. We have a purpose built machine for this step (I'm not 100% sure what it's called but it has blades positioned in a circular form, kind of like a giant NutriBullet but instead of the blades on the bottom, they're on the side).
We put the softened harakeke into this machine with water and let it mince away for 30mins-1hour. Once that’s done, we pour the mixture into a muslin bag to separate the water from the fibre.
Then it’s time to squeeze out the excess water, we do this by massaging the bag, similar to kneading bread dough. If you’re not in a rush, you can also leave the bag on the lawn and let gravity do the work.
Step 3: Beat the Pulp
Next, transfer the softened fibres into a hollander beater. This machine breaks the harakeke down into a fine, even pulp, perfect for paper making. You’re aiming for a smooth slurry with the fibres suspended evenly in the water. We usually leave our hollander running for a few hours while we get on with other projects.
Once the slurry is ready, strain it through the muslin bag again and gently massage out the excess water.
Step 4: Pour and Press


Now it's time to set up your paper making station. Get a tub larger than the size of your mesh screens (mould and deckle) and fill with water. Scoop a handful of pulp into the water, using your hands spread the pulp evenly through the water. Grab your mould and deckle and slide it vertically into the water, lay it horizontally under the surface of the water and slowly and evenly lift them out of the water.
Remove the deckle from the mould. Grab your mould and carefully flip onto your drying surface. Before lifting the mould off, use a sponge to press gently across the mesh. This helps remove most of the water. Press across the entire surface, then slowly peel the mould away.
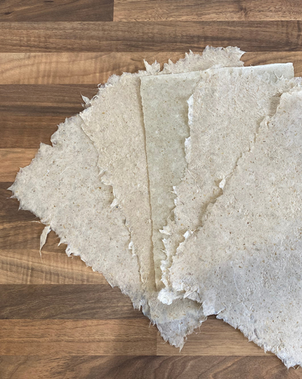
Step 5: Dry
Once the pulp is on the drying surface, use a clean, fluffy roller to carefully remove any bubbles. Depending on your space and weather, drying may take a full day or more. Once it’s dry, gently peel it off your drying surface, we use a bone handle knife to get under a corner to start the peeling process. Take your time with this to avoid tearing the paper.


Step 6: Finishing touch
We like the rough organic edge without using the deckle, if this isn't your cup of tea you can trim the edges of the paper for a cleaner finish. Once we have a decent pile of paper we leave them on a hard surface , like a table, and pile heavy books on top to press the paper flat. Once the paper is flat we store it in a cool, dry cupboard until we're ready to use it.
Storing excess pulp


If you don’t have time to process all your pulp straight away, you can store it for later. We usually take a handful of pulp, squeeze out the excess water, and leave it on the concrete to dry out completely. Once dry, we keep the pulp balls in a cardboard box in a cupboard until we’re ready to use them.
When it’s time to make more paper, just rehydrate the dried pulp in water. We use an old food processor to help loosen the fibres again, then continue with the paper making process as usual.
See the Process in Action
We’ve documented the whole papermaking process step by step, so if you’d like a closer look at how it all comes together, check out the link below. You’ll see everything from breaking down the fibres to flattening the dried sheets
Tips

Finer pulp makes smoother more consistent paper.
Try adding natural textures like dried leaves or flower petals.
The less permeable the surface you let the paper dry on the less textured the paper.
Harakeke paper makes a great base for painting, printing, or mixed media work.
Interested in learning more?
We run papermaking workshops where you can learn the whole process and make your own harakeke paper from scratch. If you’re interested, get in touch. We’d love to hear from you!


Comments